
Team-based access lets Account Administrators manage user access across multiple workspaces from a single place. By assigning users to teams, permissions and workspace access can be managed centrally instead of configuring each workspace individually.
This article explains when to use Team-based access and how to configure teams efficiently to manage user permissions across multiple workspaces.
TABLE OF CONTENTS
- Before you begin
- How Team-based Access Simplifies User Management
- What Is a Team in Limecraft?
- When to Use Team-based Access or Workspace Roles
- Common Use Cases
- How to Create and Manage a Team
- Viewing Member Access and Permissions
- Best Practices
- Already using role-based access permissions?
- FAQ
Before you begin
To configure Team-based access, you must be an Account Administrator.
How Team-based Access Simplifies User Management
Team-based access allows administrators to manage recurring access patterns centrally across multiple workspaces. Instead of configuring access individually for every workspace, administrators can create teams that define which users have access, which permissions they receive, and which workspaces they can access.
For example, a broadcaster working with multiple production companies across many active productions can create dedicated teams for recurring user groups. When a new workspace is created, administrators only need to link the relevant team rather than manually inviting users and assigning permissions again.
Team-based access helps organisations:
- Manage recurring access patterns from a single location
- Apply consistent permissions across multiple workspaces
- Reduce manual administration when users or projects change
- Ensure users have the correct access throughout the production lifecycle
What Is a Team in Limecraft?
A team is a reusable access configuration that connects users, permissions, and workspaces.
Instead using role-based access control of granting permissions one user at a time in every workspace, administrators can:
- Create a team.
- Define what members of that team can do.
- Select which workspaces the team can access.
- Add users to the team.
Any user added to the team automatically receives access to all linked workspaces. Teams do not replace Workspace Roles. Both methods can be used together.
How Permissions Are Combined
A user can belong to multiple teams and also be assigned one or more Workspace Roles. Their effective permissions are the combination of all permissions granted through team membership and Workspace Roles.
For example:
User
|
|__team: Editors
| |__Edit metadata
|
|__team: Reviewers
| |__Approve deliveries
|
|__Workspace Role
|__Download media
Effective permissions:
- Edit metadata
- Approve deliveries
- Download media
When to Use Team-based Access or Workspace Roles
Teams-based access and Workspace Roles work together to manage user permissions.
A user can have both a Workspace Role and be a member of one or more teams at the same time. Permissions granted through both models are combined, allowing you to use Team-based access for recurring access patterns while keeping Workspace Roles for workspace-specific or individual exceptions.
The key difference is the scope of access management:
Workspace Role | Team |
Workspace-specific | Can span multiple workspaces |
Managed within a workspace | Managed centrally at account level |
Best for individual exceptions | Best for recurring access patterns |
Project-specific | Organisation-wide |
Assigned directly to users | Assigned through team membership |
Choose Workspace Roles when:
- access only applies to a single workspace
- you're granting permissions to an individual user
- someone needs different permissions from the rest of their team
Choose Team-based access when:
- the same users need access to multiple workspaces
- users regularly join or leave your organisation
- access should be managed centrally
Common Use Cases
Content Delivery | Production company
Problem
A broadcaster works with the same production company across multiple productions.
Using Team-based access
Create one team with the required permissions and link it to all relevant workspaces. Users can be invited to one team instead of inviting individually to each workspace.
Accessibility & Localisation | Freelance subtitlers
Problem
Freelance subtitlers require specific more limited permissions.
Using Team-based access
Create one team 'Freelance Subtitlers' with permissions limited to editing transcripts, creating subtitles and reviewing subtitle content. The team is linked to all workspaces that require subtitling.
Production Departments
Larger organisations often set up dedicated teams or roles for:
- Production
- Archive
- QC
- Delivery
- Editorial
Each department can have its own team with an appropriate set of permissions. This ensures permissions remain consistent across all productions.
Central Management of Admin Permissions
Specific teams can be configured to access admin permissions of current and future workspaces.
This is especially useful for:
- Account Administrators
- Workspace Administrators
- Archive Administration
- Delivery Administration
When new workspaces are created, they are automatically linked to the team. No manual invitations or linking is required.
How to Create and Manage a Team
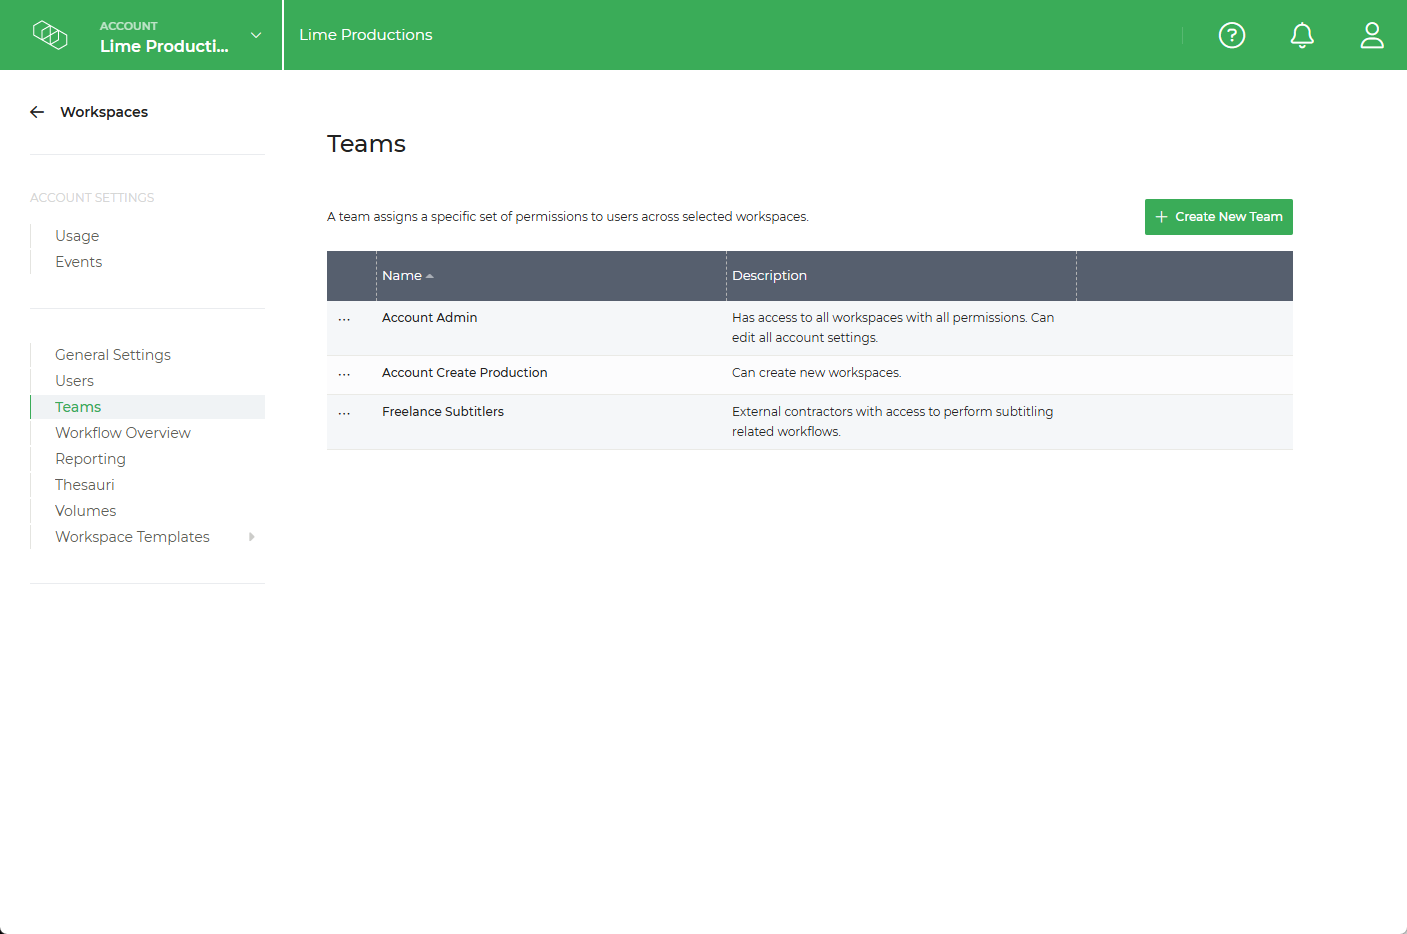
Team-based access is managed by Account Administrators from Account Settings > Teams.
From here, you can:
- Use one of the predefined teams.
- Create new teams.
- Edit existing teams.
- Manage team members, permissions and linked workspaces.
Predefined Teams
Every account includes two predefined teams:
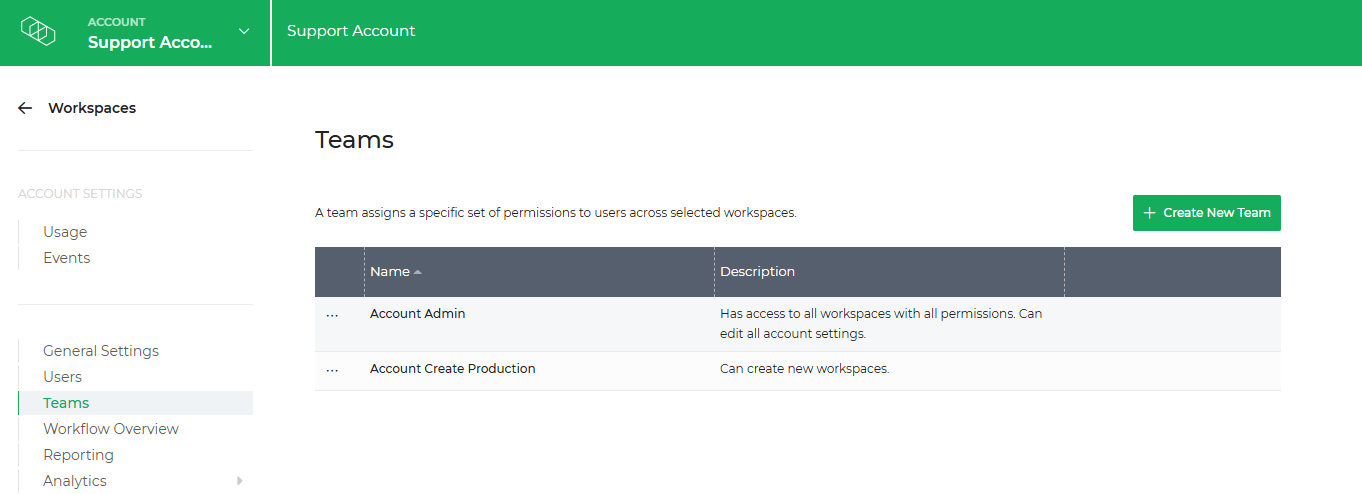
Account Admin
The Account Admin team provides:
- Full account administration
- Access to all workspaces
- All available permissions
Create Production
The Create Production team allows users to create new workspaces without granting full account administration rights.
Workspace Type
When creating a team, you must select a Workspace Type:
- All
- Production Workspace
- Delivery Workspace
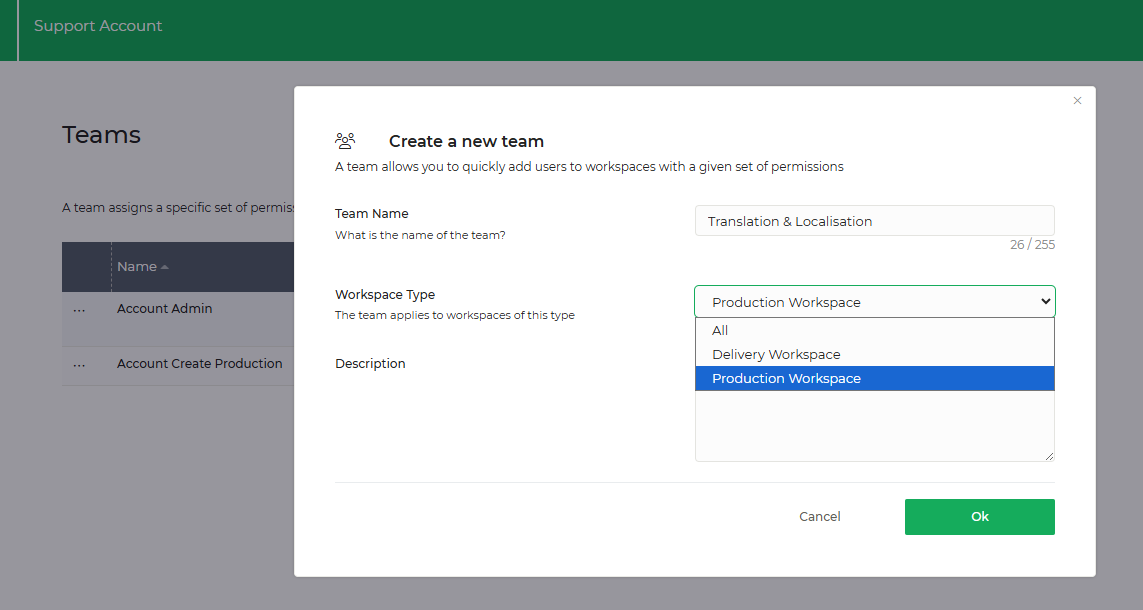
The selected Workspace Type determines which workspaces can be linked to the team and which permissions are available.
For example:
- Production Workspace exposes production-related workspaces and permissions
- Delivery Workspace exposes delivery related workspaces and permissions
- All allows the team to be used across both workspace types.
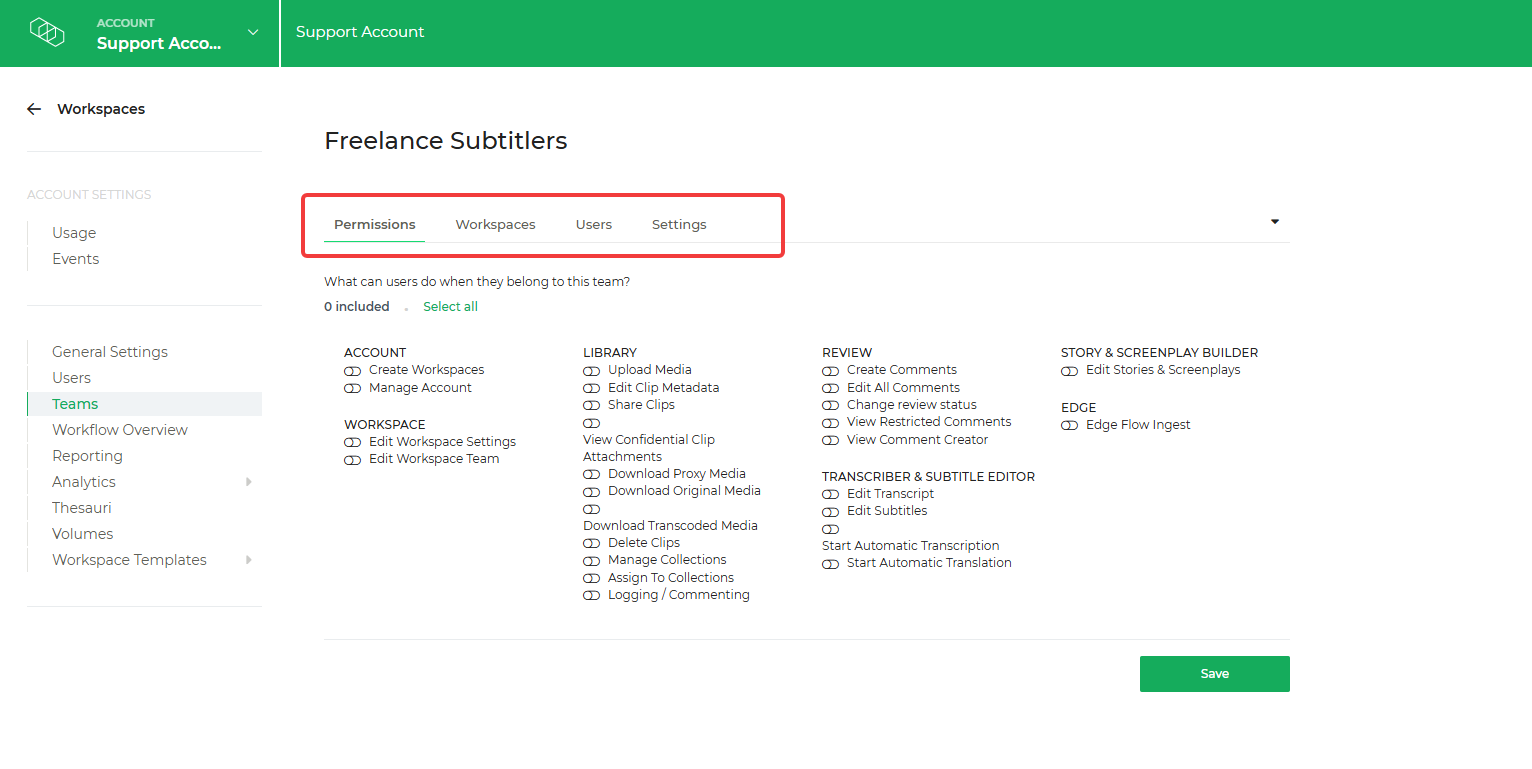
Create a Team
- Go to Account Settings > Teams
- Click Create New Team
- Choose the appropriate Workspace Type
- Configure the team's permissions. NOTE: The Manage Account permission automatically grants all permissions and links the team to all workspaces.
- Link the required workspaces, or choose to automatically include all existing and future workspaces.
- Add team members.
- Existing account members receive access immediately
- New users receive an email invitation to join the account and team.
Manage an Existing Team
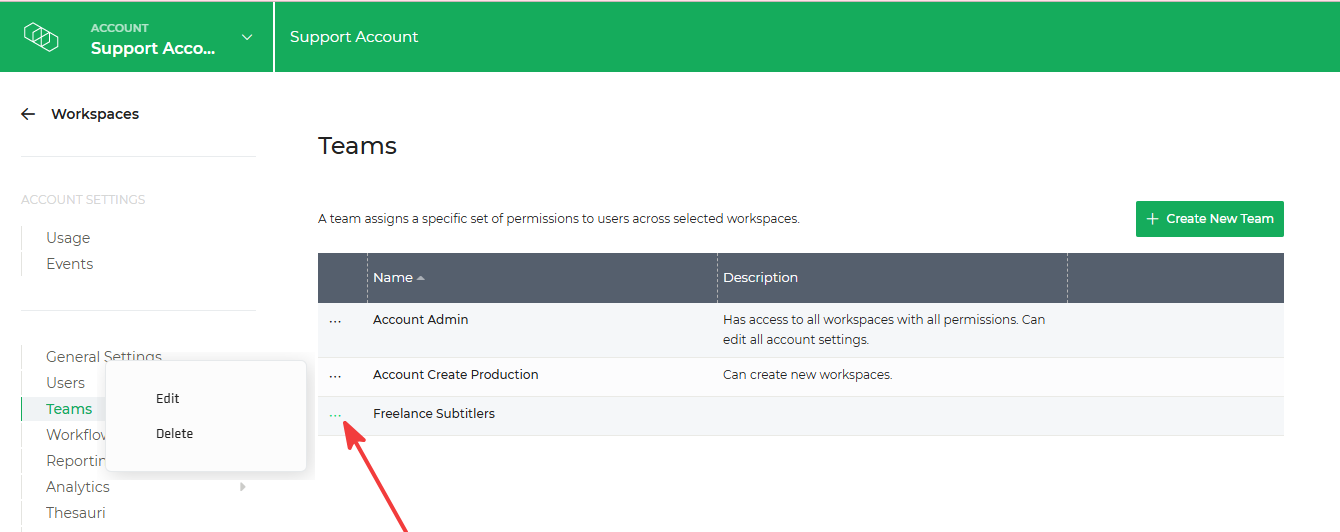
To update a team, select the three-dot menu next to the team name.
From here, you can:
- Edit team details.
- Update permissions.
- Add or remove members.
- Link or unlink workspaces.
Viewing Member Access and Permissions
Account Administrators and Workspace Administrators can review user access and permissions from two locations: Users in Account Settings and Workspace Members in Workspace Settings.
NOTE: Only Account Administrators can access Account Settings and view account-level user information.
Users in Account Settings
The Users overview provides an account-level view of members and shows:
- Team membership
- Workspace membership.
- Click the eye icon to view which workspaces a user belongs to.
- Account Owner status

Use this view to understand which teams a user belongs to and which workspaces they can access.
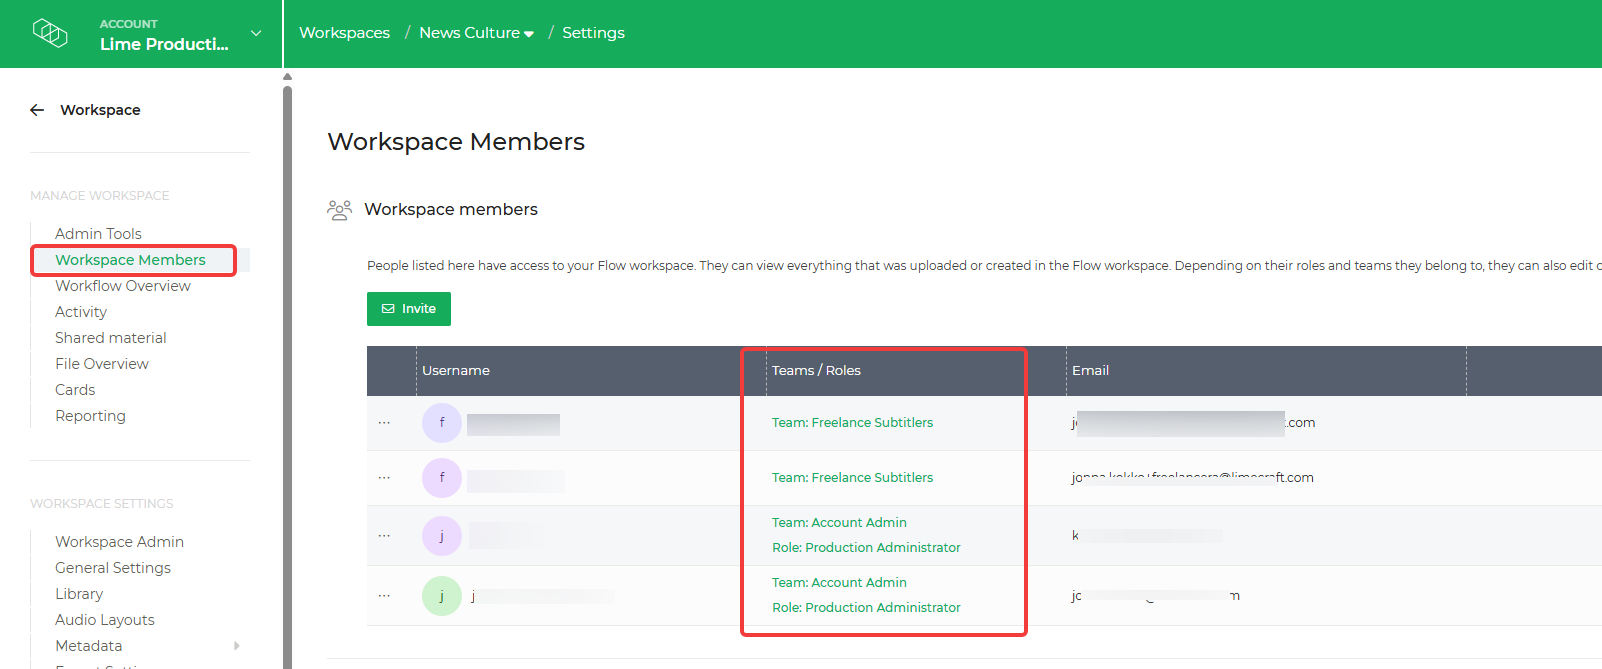
Workspace Members in Workspace Settings
The Workspace Members overview provides a workspace-specific view and shows:
- Access granted through team membership
- Direct Workspace Roles
- Pending team invitations
- Pending workspace invitations
This view helps you understand why a user has access to a specific workspace and whether their permissions come from a team or a Workspace Role.
By checking these two locations, administrators can understand how user access has been assigned and distinguish between access provided through team-based access and access granted through Workspace Roles.
Removing a Member Who is Leaving the Organisation
When a user leaves the organisation, the easiest way to remove their access is from the Account Settings Users page.
To remove a user:
- Go to Account Settings > Users.
- Find the user you want to remove.
- Click the red cross icon to remove the user from the account.
Removing a user from the account will automatically remove:
- Any Workspace Roles assigned to the user.
- Any team memberships.
- Access to workspaces granted through team-based access
This ensures that the user's access is fully evoked across the account.
Best Practices
- Use teams for recurring permission patterns.
- Use workspace roles only for exceptional cases.
- Create teams around functions or responsibilities rather than individual users.
- Use descriptive team names.
- Use "All Workspaces" sparingly and only when appropriate.
- Review team membership periodically.
- Prefer Team-based access for external partners who participate in multiple productions.
Already using role-based access permissions?
You don't need to migrate everything at once. Team-based access and Workspace Roles work together, allowing you to gradually move recurring access patterns to teams while keeping workspace roles for individual exceptions.
FAQ
What happens when I add someone to a team?
They immediately receive the team's permissions in every linked workspace.
What happens when I remove someone from a team?
They lose the permissions granted through that team but retain any permissions assigned through other teams or workspace roles.
What happens when I link another workspace to a team?
Every team member automatically receives access to the newly linked workspace.